AMR File Synchronization
File synchronization is a method that allows you to transfer Credential data to third-party systems using an Azure Storage account. This approach is particularly useful when the receiving system supports file-based data transfers, making it a seamless way to move Credential information.
To learn more about AMR and other methods of transferring Credential data to third-party systems, visit the Access Management Router (AMR).
Prerequisites
- Availability: This feature is available only for Enterprise plans.
Contact your Breeze representative or dealer to explore available Enterprise plan options.
Required roles:
System AdministratorData Exporter
These roles are necessary to perform the file synchronization configuration. If you do not hold these roles, please contact someone in your organization who does.
Before starting the AMR File Synchronization setup, make sure you meet the following prerequisites:
- Access to the Breeze Admin Portal.
- An Azure Storage account that includes a File Share for storing the synchronized data.
- A clear understanding of which data fields you want to transfer to the third-party system.
Note: If you don’t have an Azure Storage account set up, the Breeze Team can assist in providing one as a service. Reach out to Breeze Support for more information.
Azure Storage Account Configuration
To use file synchronization, you need to configure your Azure Storage account. The account must have a File Share set up to receive the synchronized data.
If you are unfamiliar with configuring Azure Storage, refer to the official Microsoft Azure Storage documentation.
Before moving forward with the AMR synchronization steps, ensure you have the following details:
- Storage account name
- File Share name
- Storage account access key or secret
- File path and name for the file that will store the synchronized data.
File Format
The AMR synchronization process uses a CSV file format to transfer data. This CSV file is created by the AMR service during the synchronization process and should not exist prior to synchronization.
Key characteristics of the file:
- File type: CSV (Comma-Separated Values)
- Column separator: Semicolon (
;) - Header row: The first row of the file contains the column headers that identify the data fields.
Important: The format of the file should never be modified, as the AMR service relies on the exact format to process the data correctly. You can remove rows (e.g., individual credentials), but changing the structure of the file could disrupt the synchronization process.
For guidance on adjusting the content of the file, refer to the Modify File Content section.
Do not alter the file format. Doing so could cause the synchronization process to fail.
Modify File Content
If you need to adjust which records are synchronized, you can safely modify the CSV file content with the following constraints:
- Remove entire rows to exclude specific Credentials from being processed.
- Do not add, remove, rename, or reorder columns. The header row and column order must exactly match the AMR configuration.
- Keep the semicolon (;) delimiter unchanged.
- If images are included as Base64 columns, ensure values are valid Base64 without line breaks.
- If images are synchronized as separate files, you may delete specific image files; depending on settings, they can be recreated on the next sync.
If you later change field mappings in AMR, ensure the CSV columns and order match the new configuration. For details, see Field Mappings.
Available Data Fields
When setting up the AMR File Synchronization, you can choose which data fields to include in the CSV file. You can find a complete list of available fields here: Available Data Fields.
Carefully evaluate the fields you select to ensure they meet the long-term needs of the third-party system. Once synchronization starts, altering the configuration could require a migration of existing data.
Additionally, export only the necessary data fields to avoid cluttering the system with irrelevant information.
Images in File Synchronization
Option 1: Images as Separate Files
The AMR File Synchronization process can include images as individual files within the Azure File Share. This feature needs to be enabled in the AMR configuration (see Sync Images). If enabled, images are stored in a folder named images within the Azure File Share.
For each credential, the following images will be created (if available):
- PersonPhoto1: Saved as
PersonPhoto1_<Credential ID>.jpg. - PersonPhoto2: Saved as
PersonPhoto2_<Credential ID>.jpg. - PersonSignature: Saved as
PersonSignature_<Credential ID>.jpg. - Credential Front Image: Saved as
Front_<Credential ID>.jpg(a full-size image of the front of the credential/card). - Credential Back Image: Saved as
Back_<Credential ID>.jpg(a full-size image of the back of the credential/card).
If an image is not available, the corresponding file will not be created.
Option 2: Images as Base64 Encoded Strings
Alternatively, images can be included directly in the CSV file as Base64 encoded strings. This method is useful when embedding images within the data file itself, rather than storing them separately. In this case, the column header will use the image field name (e.g., personPhoto1), and the image data will be represented as a Base64 encoded string within the CSV.
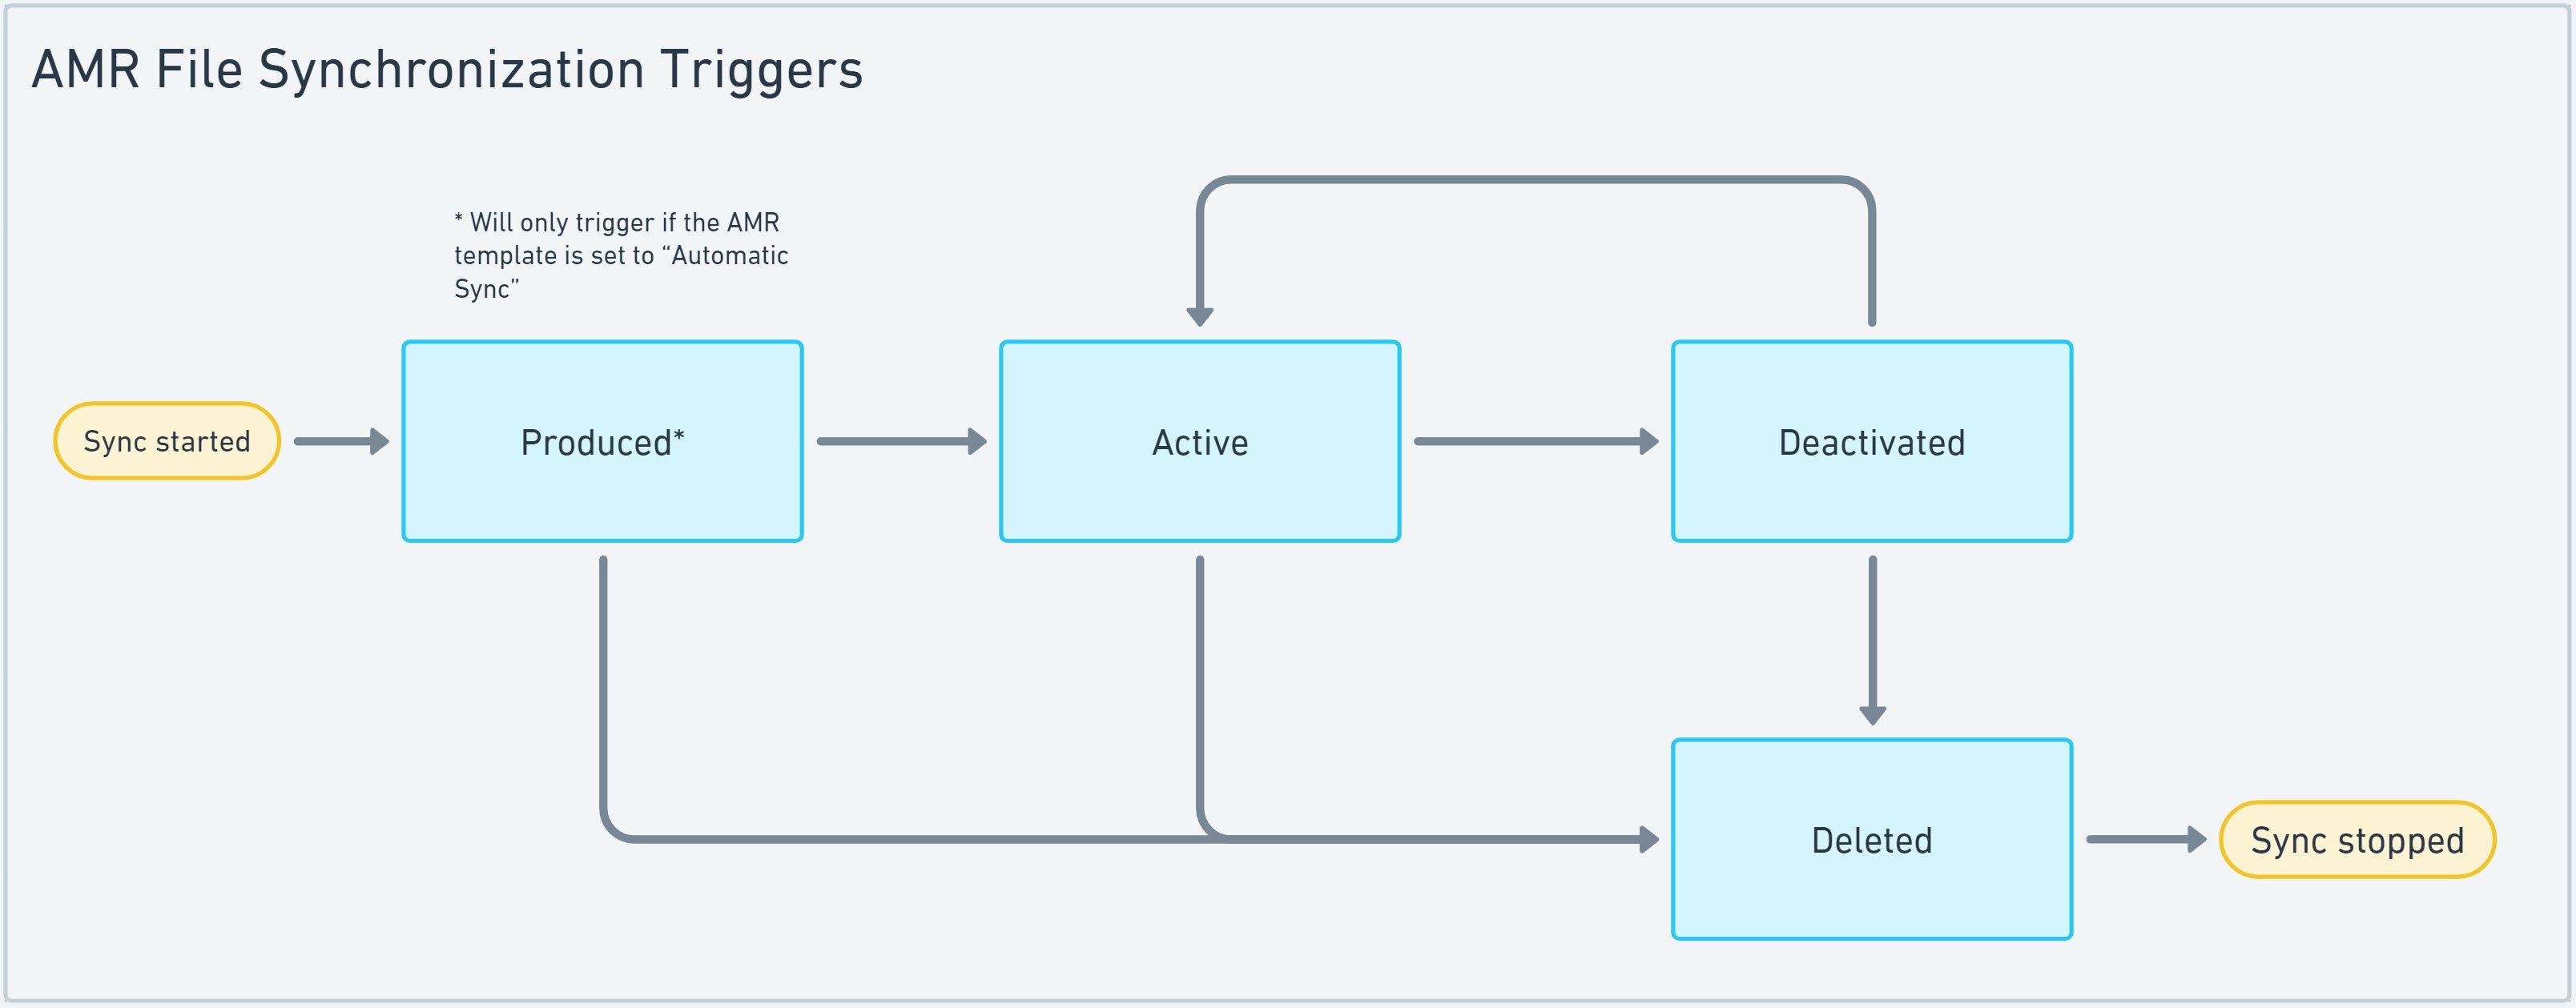
Triggers for File Synchronization
AMR provides built-in triggers that automatically synchronize data based on changes in the status of a Credential. These events activate the synchronization and transfer updated Credential data to the third-party system.
The triggers include:
- Credential produced (triggered if AMR is set to "Automatic Sync")
- Credential activated
- Credential deactivated
- Credential deleted
For example, when a credential is activated, the AMR will automatically sync the associated data with the third-party system.
Create a New AMR File Synchronization Configuration
To set up AMR File Synchronization, follow these steps:
- Access the Tenant: Log into the Breeze portal and navigate to the
Tenantwhere you want to configure file synchronization. - Go to Templates: In the left-side menu, select
Templates. - Open AMR Transfer Templates: Click the
Go to AMR Transfer Templatesbutton. - Create a New Template: Click on the
Create New AMR Transfer Templatebutton. - Select the AMR Transfer Type: Choose
FILE_SYNCas the transfer type. - Complete the Form: Fill in the required fields with the configuration details (see next section for details).
- Test Connection: Use the
Test Connectionbutton to confirm that the Azure Storage account is correctly set up. - Save: Once everything is configured, click
Saveto create the AMR File Synchronization configuration.
After saving, the configuration will be created but not yet ready for use. Continue with the Configure AMR File Synchronization section to finalize the setup.
Settings Details
| Setting | Description | Example Value |
|---|---|---|
| Name | The name of the AMR File Synchronization configuration. | Access Control System Transfer |
| Client ID | The name of the Azure Storage account. | breezestorage |
| Client Secret | The access key/secret for the Azure Storage account. | ueJVIw0XXXXXXXXfcQB3w== |
| Azure Share Name | The name of the File Share in Azure. | breeze-share |
| File Name | The file name used for synchronization. | access-control.csv |
Configuring AMR File Synchronization
Roles required:
System AdministratorData Exporter- You need both of these roles to perform the following configuration steps. If you don't have these roles, please contact your system administrator.
Once the AMR File Synchronization configuration has been created, it needs to be customized to fit your specific requirements. To do this, follow these steps:
- Locate the AMR File Synchronization configuration in the list of configurations.
- Click the Edit button next to the configuration to open the settings dialog.
- Adjust the settings according to your needs. A description of each setting is provided below.
- After making your changes, be sure to click the Save button to apply them.
Key Configuration Settings
Template Name
You can change the name of the AMR File Synchronization configuration. This name should reflect the purpose or destination of the synchronization to easily identify it later (e.g., “Access Control Sync to Azure”).
Report Incidents To
To receive email notifications in case the synchronization process encounters errors or fails, you can add an email address here. This is particularly useful for monitoring and troubleshooting.
General Settings
| Setting | Description |
|---|---|
| Active | Toggle whether the configuration is active. Only active configurations will be available for selection when setting up an AMR on a Credential Template. |
| Activation method | Defines how the AMR sync for a Credential will be triggered. You can choose between Automatic sync and Manual sync. |
| Sync images | Specifies whether images should be included in the synchronization. The available options are Always, One time, or Never. |
| Allowed for sub-tenants | Determines if the AMR configuration is accessible to sub-tenants under the current Tenant. |
Activation Method
This setting controls how the synchronization is triggered for a Credential:
- Automatic sync: The synchronization will start automatically as soon as a Credential is produced. No manual intervention is needed.
- Manual sync: The synchronization must be manually initiated from the Credential view before data is transferred to the third-party system.
Choose the option that best fits your workflow—automatic syncs are ideal for hands-free updates, while manual syncs offer more control.
Sync Images
The Sync images option determines if images (such as photos and signatures) are included in the synchronization process. If this option is enabled, the images will be transferred to the third-party system as files in the Azure storage.
There are three options to choose from:
- Always: Images will be synchronized during every sync, ensuring that they are kept up-to-date with every data transfer.
- One time: Images will be synchronized only during the first sync. Subsequent syncs will not transfer or update images.
- Never: No images will be included in the synchronization.
Images that may be transferred (if available) include:
- PersonPhoto1
- PersonPhoto2
- PersonSignature
- Credential front image (a full-size image of the front of the credential/card)
- Credential back image (a full-size image of the back of the credential/card)
Allowed for Sub-tenants
If this option is enabled, the AMR File Synchronization configuration will be made available for all sub-tenants under the current Tenant, provided they share the same System Domain. This is useful when multiple sub-tenants require the same synchronization setup, streamlining the process across different parts of your organization.
Storage Settings
If needed, you can modify the Azure Storage account settings for the file synchronization. To do so:
- Click the Edit button to open the settings dialog.
- Make the necessary changes (such as updating the storage account key or share name).
For more details on the storage settings, refer to the Create a New AMR File Synchronization Configuration section.
Field Mappings
Changes to field mappings should be made with caution. Adjusting field mappings may disrupt the synchronization process if not handled correctly.
If you add, rearrange, or remove fields from an active AMR configuration, you may need to manually update the corresponding file in the Azure Storage account to match the new field mappings. The sync will fail if the file and mappings are not aligned.
In this section, you can define which data fields will be included in the CSV file used for synchronization.
-
Open the Field Selection Dialog: Click the Change settings button to open the field selection window.
-
Select Data Fields: Choose the source object and the specific fields you want to include in the CSV file, then move them to the
Selectedcolumn. -
Rearrange Fields: Use the up/down arrows to rearrange the order of the selected fields.
infoThe order of the fields in the CSV file will match the order in the
Selectedcolumn. Make sure the order aligns with the expectations of the third-party system. -
Save Changes: Click Save to apply the field mappings.
For a complete list of available data fields, refer to Available Data Fields.